Heroes 3.5: In the Wake of Gods Portal > Steam Deck Installation Guide – Heroes III: Horn of the Abyss v1.7
Steam Deck Installation Guide – Heroes III: Horn of the Abyss v1.7

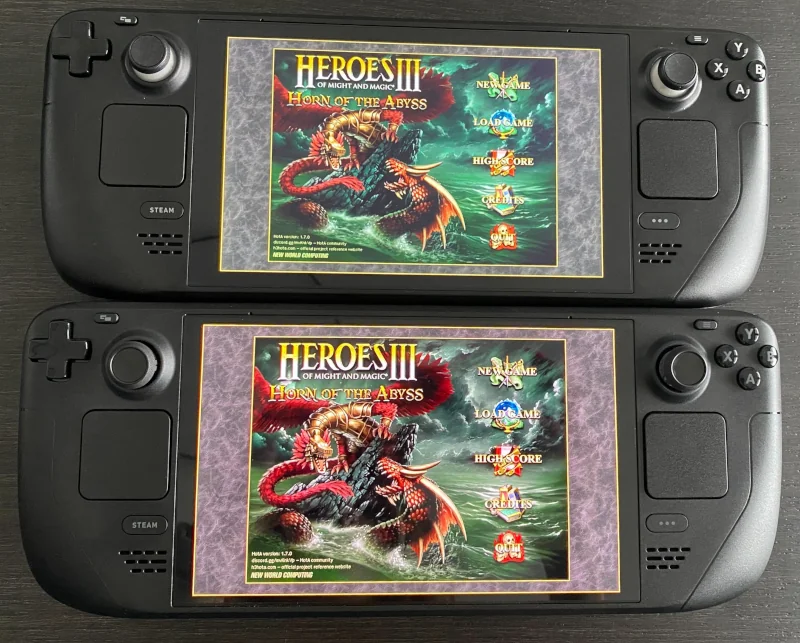
Thanks to the Reddit user JustMy42Cents, we have a great tutorial on how to install the Heroes of Might and Magic III: Horn of the Abyss with the HD Mod on a Steam Deck. It is using the Steam application with the Proton compatibility layer, and as such it does not require setting up Wine, Lutris, or any other third-party launchers.
While written with SteamOS in mind, this should work on most Linux systems as long as the Steam client is installed. Keep in mind that a couple of steps are specific to the Deck though.
1. Enter the Desktop Mode
Press the Steam button and navigate to the Power menu, or long-press the power button to enter it directly. Choose the “Switch to Desktop” option.
2. Download the installers
Heroes of Might & Magic III: Complete Edition can be purchased from GOG. Make sure to download both files listed as the offline backup game installers into the same folder.
The Horn of the Abyss expansion installer can be download from one of the mirrors listed here.
Do not, and I repeat, do NOT buy the version available as “Heroes® of Might & Magic® III – HD Edition” on Steam. This is The Restoration of Erathia with revamped graphics, so it lacks all of the content and patches from the official expansions. It also remains incompatible with the fan expansions and mods.
As a result, you should have the following files locally (versions might vary):
setup_heroes_of_might_and_magic_3_complete_4.0.exesetup_heroes_of_might_and_magic_3_complete_4.0.binHotA_1.7.0_setup.exe
3. Add the installers to Steam
Open the Steam client. Click the “Add a Game“ button in the bottom left corner and choose the “Add a Non-Steam Game…” option.
After the “Add Non-Steam Game“ pop-up appears, click on the “Browse…” button and select the downloaded exe files. You do not have to add the binary file with the bin extension. The file chooser might not support selecting several files at once, but after selecting a file you can press the “Browse…” button again for the second installer.
After both the game and the expansion installers are chosen, click on the “Add Selected Programs” button. Both files should now appear in your Steam library.
4. Prepare the installers
Navigate to the Steam library and locate the setup exe files in the left menu. Right-click (L2) on each of the setup entries and enter the “Properties…” menu.
In the Properties, change the tab to Compatibility and click on the “Force the use of a specific Steam Play compatibility tool“ checkbox. At the time of writing this guide, Proton 8.0-4 was the latest stable release, and it seems to work fine. Close the window after choosing a compatibility tool. Repeat this for both of the installers.
4.1 (Optional) Enable mouse trackpad
When adding a non-Steam game, the button layout might default to “Gamepad With Joystick Trackpad” or a different one without a trackpad mouse support. Right trackpad can still be used as a mouse when the Steam button is pressed, but the button layout can also be changed for convenience.
To change the layout, you can access the “Controller Settings” by selecting the exe file in the library and clicking the controller icon button on the right. Switch from the default layout to one of the predefined templates that supports a trackpad mouse such as “Mouse Only” at the top of the “Controller Settings” window. This can be done for both installers.
5. Run the Heroes III Complete installer
Enter the Heroes III Complete installer in the Steam library and click the ► PLAY button. Choose the language and press the “Options” button in the left bottom corner once the installer window appears.
To avoid installing the game in a generic Wine folder, click the “Browse” button under the “Install game to:” label. The built-in Steam Deck drive should be available under (Z:), while the home folder is (Z:) > home > deck. SD card (if any) should appear as a separate drive, for example (E:).
After selecting a base folder, you leave the suggested game folder name as is, or you can change its name at the top of the file chooser in an input field that displays the selected path. Press Steam+X buttons to open the on-screen keyboard and modify the path freely; the installer should create any missing folders. Use \ as a path separator between the folders. In the screenshot above, the target folder was chosen as Z:\home\deck\Games\Heroes3 to make it easier to locate the installed game later on.
After selecting the folder and accepting the EULA, install the game without launching it after it’s done.
6. Run the Horn of the Abyss installer
Enter the Horn of the Abyss installer in the Steam library and click the ► PLAY button. Choose the language and go through the installation steps. Select the same folder that was used to install the game. During the setup you can also deactivate associating file extensions with HotA tools, and choose whether to allow automatic updates or not.

Horn of the Abyss installer
6.1 (Optional) Remove the installers
The installers are no longer needed in your Steam library. Feel free to right click them (L2) and select the “Manage > Remove non-Steam game from your library” option.
7. Add the installed game to the library
Similarly to steps 3. and 4., you now need to add the following exe files from the installation folder as non-Steam games and enable the compatibility layer:
h3hota HD.exeHD_Launcher.exe
You can also optionally add editors such as h3hota_cmped.exe (campaigns) or h3hota_maped.exe (maps).
8. Update HD mod
Launch the HD_Launcher.exe.
Click on the “Update” button near the left bottom corner. The version of the HD Mod shipped with Horn of the Abyss is likely to be outdated. Installing the latest version is necessary to access the online lobby, and is recommended in general due to frequent bug fixes.
You can also customize the display settings here. These look pretty good to me and run smoothly:
Mode: (stretchable) 32-bit OpenGL by Verok
Source size: 1062×664
Stretch filter: None (these generally make the fonts less crisp, but do experiment) + Linear Sharper
System Cursors and Full Screen Mode enabled
Additionally, you can open the “Tweaks” tab, locate the <Sys.CPU.ReduceUsage> = 0 line, and change the value from 0 to 2 using the on-screen keyboard (Steam+X). This should limit the CPU usage at no apparent drops in the performance, improving the battery live.
Heroes of Might & Magic III: Horn of the Abyss is now ready to play. You can pretty much stop right there and enjoy the game, but there’s a couple of things you can do to improve the experience.
9. (Optional) Update game icons
Go to SteamGridDB and download the images for the game. Here’s how to change all the artworks for a library entry manually:
Icon: right click (L2) on the entry in the left menu of the library and enter “Properties…”. Click on the icon on the left of the shortcut name and choose the file.
Logo: open the entry in the library. Right click on the upper side of the screen and select “Set Custom Logo”.
Background: open the game in the library. Right click on the upper side of the screen and select “Set Custom Background”.
Grid images: launch the game, then close it and navigate to the library home page. Scroll down to the “Recent Games” section. Your game should be the first one on the left. Right click (L2) on it and select Manage > Set custom artwork. Choose the wider grid image. Then launch a different game, close it, and go back to the library. Your game should now be the second one from the left. The same option in the right click menu should now allow you to set the narrow grid image.
10. (Optional) Update game controls
Any layout with the mouse trackpad support is sufficient to make the game playable, but there’s quite a few keyboard shortcuts that can improve the experience when mapped onto Steam Deck buttons. Steam allows sharing custom layouts with other users, and for non-Steam games it seems to use the entry name when searching for the community layouts.
Right click (L2) on the games in the library, enter the “Properties…“ menu, and rename the shortcuts as follows to access a couple of shared layouts:
h3hota HD.exe: Heroes of Might & Magic III: Horn of the AbyssHD_Launcher.exe: Heroes of Might & Magic III: HD Launcher
After the entries are renamed, click on the controller icon button and attempt to change the layout at the top of the window. Enter the “Community Layouts“ tab.
I strongly recommend downloading and applying the HD Mod Shortcuts layout, since it’s the most complete setup with a ton of shortcuts under customized radial and grid menus for the trackpads and joysticks. This layout comes with 2 action sets that you can toggle with the Select button above the left joystick. You will find all shortcuts at the end of the article.
The game works best in the gaming mode. The on-screen controls are not as smooth in desktop mode, and I’ve seen some flickering when certain in-game dialogs are displayed. I had none of these issues in the gaming mode. After you’re done with the setup, I recommend going back to the gaming mode to actually play the game.
And that’s it! Enjoy this classic in one of the most portable forms yet.
HD Mod Shortcuts – Map Action Set
Buttons
A: Enter – Confirm. Closes most dialogs.
B: Escape – Cancel. Exits most screens.
X: Space – Re-enter. Interacts with current hero’s location.
Y: M – Moves hero along the selected path.
Bumpers and triggers
L1: Shift – When pressed, clicking on a unit splits it into even stacks.
R1: Control – When pressed, clicking on a unit splits a single 1-stack.
L2: Right Mouse Click – Displays info on map locations, units, heroes, etc.
R2: Alt – When pressed, clicking on a unit merges its stacks. Additionally, on the adventure map pressing R2 and hovering over a location displays the hero movement points cost at the bottom of the screen.
Back grips
L4: Control + Shift – When pressed, clicking on a unit splits a 1-stack into every free slot.
R4: Control + Alt – When pressed, clicking on a unit transfers into into garrison or to a hero.
L5: Control + Alt + Shift – When pressed, clicking on a unit transfers entire army into garrison or to a hero.
R5: Alt + Shift – When pressed, clicking on a unit opens the dismiss dialog.
Menu buttons
Select: Change Action Set – Toggles the controller action set between the Map mode and Combat mode.
Options: O – Displays the options dialog.
Joysticks
Left Joystick: Map Menu – Displays a radial menu with some of the less commonly used shortcuts. All shortcuts are described in game. Joystick has to be clicked in order to execute the shortcut.
Right Joystick: Artifact Costumes – Displays a radial menu mapping the artifact costume sets. On the hero screen, it allows changing the equipped artifacts with a single click. Costumes are saved globally rather than per hero. To save the currently equipped artifacts on the hero screen, press and hold R1 (Control) and then click an artifact set shortcut in the radial menu with the joystick. After a set is saved, clicking on the artifact set shortcut will equip the saved artifacts, putting any extras in the backpack. Pressing L1 (Shift) and clicking on an artifact set will add or replace the saved artifacts, but it will not remove any extras. Shortcut in the middle (0) restores the equipped artifacts from before selecting any artifact sets.
Trackpads
Left Trackpad: Hero Movement – Displays a grid menu allowing for precise movement of the hero on the adventure map. Moves the currently selected hero into any of the 8 directions. Shortcut in the middle (Space) allows re-entering the current hero’s location.
Right Trackpad: Mouse – Controls the cursor. Clicking the trackpad is equivalent to a standard left click.
DPad is mapped as the arrow keys. On the adventure map, it allows to move the hero in 4 directions by 1 step. On dialogs with longer texts, up and down arrows can be used to scroll through it.
HD Mod Shortcuts – Combat Action Set
Buttons
A: Enter – Confirm. Closes most dialogs.
B: Escape – Cancel. Exits most dialogs.
X: Space – Commands the active unit to defend during the battle. Selects the next unit in the tactics phase.
Y: W – Commands the active unit to wait and act later during the turn.
Bumpers and triggers
L1: Shift – When pressed, hovering over a unit displays its movement range.
R1: Control – When pressed, hovering over a unit displays its maximum movement range without obstacles.
L2: Right Mouse Click – Displays info on the hovered unit.
R2: Control – When pressed, hovering over a unit displays its maximum movement range without obstacles.
Back grips
L4: C – Opens the spellbook.
R4: T – Displays a pop-up with info on the currently active unit.
L5: G – Aims the projectile. Works only for selected units like Magogs or Liches.
R5: Q – Displays a dialog whether to finish the battle with quick combat.
Menu buttons
Select: Change Action Set – Toggles the controller layout between the Map mode and Combat mode.
Options: O – Displays the settings dialog.
Joysticks
Left Joystick: Combat Toggles – Displays a radial menu with combat options. Most of these toggle which battle screen elements are displayed and how, allowing customization of features like the combat grid, battle queue, or hero summaries. This menu can also be used to toggle the auto combat, or to load a saved game.
Right Joystick: Joystick Mouse – This joystick automatically presses Shift when touched, allowing to check the movement ranges of the hovered units. Clicking the joystick is mapped as a right mouse click, displaying info dialog on the hovered unit. This is an alternative to the right trackpad when planning unit movements without the possibility to accidentally move a unit.
Trackpads
Left Trackpad: Combat Menu – This extremely useful grid menu displays common battle shortcuts such as waiting, defending, aiming, or spellcasting. Along with the right trackpad mapped as a mouse, these two trackpads offer sufficient controls to go through the vast majority of battles.
Right Trackpad: Mouse – Controls the cursor. Clicking the trackpad is equivalent to a standard left click.
DPad is mapped as the arrow keys. During battle, up and down arrows allow scrolling through the combat log entries displayed at the bottom of the screen. If the complete combat log dialog is displayed, up and down arrows scroll through the messages.
Source: https://www.reddit.com/r/heroes3/comments/18xql2r/heroes_of_might_and_magic_iii_horn_of_the_abyss/


